Lesson 7
This Lesson will be on dying the motifs with protein reactive dyes as well as acid dyes.
Preparing thread for Dying "Protein Reactive Dye "
Any natural product not man made fibers.
From white to your choice of colors
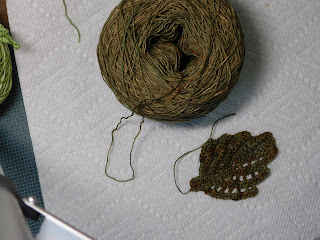
The green thread and this was Ice dyed
Hand Dyed threads are not as hard as one might think.
1- Using a Knitty-Knoddy wrap the thread and tie it off. Then remove it from the Knitty-Knoddy. Save yourself a lot of work and carefully follow the direction the thread goes onto the Knitty-Knoddy.
The web page will tell you the size of each pipe and how to construct these. I love mine.
Below are a couple of places to see how to make and use a Knitty-Knoddy
2- Prewash the threads in a dish soap, then soak in a bath of 1/2 cup Super Washing Soda (Arm & Hammer) a laundry booster. for 30 minutes.
3- While still wet put it through a gentle spin cycle in the washer. Do not rinse or allow to become dry.
4- In a deep basin place a wire rack in the bottom to allow the liquid to settle away from the thread.
5- Place the thread loosely (still tied) on the rack, place a layer of crushed Ice or snow over the thread. Making sure all the thread is covered.
6- The Dye is a fine powder so using a 1/8 teaspoon measure and gloves put dye into a glass salt shaker you can reserve only for dying. Sprinkle the desired color or colors over the ice/snow and allow to stand for 24 hours. The ice/snow will melt and transfer the dye onto the thread. when the water is clear you know all the color is in your thread.
Be sure you add the dye in small amounts. This is why I use a salt shaker.

As the ice melts the dye is disbursed and flows with the liquid to make some real unusual color patterns.
You can freeze Kool-Aid in an Ice tray and dye with them.
7- Hang over a rack or line until completely dry. Now you are ready to crochet your favorite element.

Painting the dye onto the fibers. Mix your dye as you would for any other dyeing. Using a sponge brush from the hardware store you can place the dye anywhere you like for any effect you choose.


This method is fun to do as well. You layer the ice and colors in the jar with your fibers. Making sure that your fibers are pre-soaked and scrunched before placing them into the jar. This is left in the jar for 24 hrs and then removed and rinsed and then dried with heat.
https://www.youtube.com/watch?v=ysuNZIw7Z98


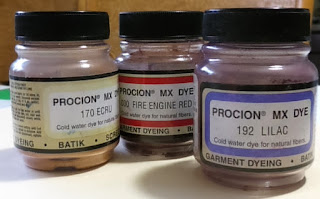
PROCION MX DYE this is what I use most of the time as it does not need to boil.
To dye with these lovely colors by Jacquard Products you will need to follow the instructions below:
There are many different kinds of Dye. I am experimenting with several.
When using Protein Reactive dyes you will need soda ash to pre-treat your threads. I use Soda Wash from the local grocery store. We mix 1/2 cup soda wash and 5 gallon of water. When dyeing threads you can mix smaller amounts. The thread soaks for 30 minutes in this and then is gently spun out to cut down adding liquid to your dye mix. DO NOT rinse at this point.
The food dyes are acid dyes so you need citric acid or white vinegar in your process. When using acid you can soak thread in water and dye and then remove the thread before you add the acid. Mix well and then put the thread back into the bath.
I have also used Kool-Aid to dye threads. This process is set in the microwave.
Super-Simple Kool-Aid Dyeing Instructions (for Kool-Aid only)
- soak yarn in plain water for at least an hour.
- mix a packet of Kool-Aid with 8 ounces water in a jar or cup.
- place yarn in a microwave-safe bowl with a cover.
- pour the Kool-Aid dye stock over the yarn.
- microwave for two minutes and let cool for ten minutes.
Jacquard is a good brand and can be found in Craft stores. I tend to buy mine online. Only because I am a home body and hate to get out in the stores very often. I find it uses up my playtime. I have found that shopping takes too long so only go out on craft shopping spree a couple of times a year. The girls day out sort of thing. http://www.jacquardproducts.com/dyes/
These are dharma dyes. http://www.dharmatrading.com/dyes/dharma-fiber-reactive-procion-dyes.html
These are a fine powder so a mask is advised. I also use gloves. We have protein in our skin so the dye will stick around a long time on your hands.
The dry powder works nicely in these shakers. I get them at the $1 store. Also you can see that I put the color name on top of the jar lids, this way you do not get the colors mixed up.
dying
https://www.youtube.com/watch?v=ysuNZIw7Z98
https://www.youtube.com/watch?v=nhEHfe3h3dA
https://www.youtube.com/watch?v=a1o1mPJK9gk
Ombre
https://www.youtube.com/watch?v=T5TED2Dxro8
Top-Tips
https://www.youtube.com/watch?v=FV_GEg_dePw
https://www.youtube.com/watch?v=4HKcFkY0-fU
Begin with the misc. threads you have left over from projects.
Make hanks of the threads you will be dyeing.
Keep like colors together.
This is when you soak in Soda Wash for reactive dyes.
Kettle Dyeing
Mix your dye and other needed ingredients in a kettle and bring to a simmer before adding your threads or other fabrics. Kettle dyeing works for reactive or acid dyes.
Simmer 30 min before checking for color saturation.
At this point you can remove the items and add more color or just simmer longer.
Constantly string the items will help keep them from having color separation issues.
Hang over a heat vent to dry. I use the bathroom one because I can close off the room for better heat and it has more rods to hang on.
Once dry you will need to place hanks back on swift to ball them up.
This is when you can begin to have fun with your new one of a kind colors of thread.


No comments:
Post a Comment